Support
1.CAll CENTER USER GUIDE
1.1 Registration :
To get call center services follow the steps below:
Open web-browser, use the given link https://ictdialer.com to visit the website as display below:
Following blurbs are shown on main page of web-page, they are named as:
Call Center
CRM Communication
SMS Marketing
Fax Marketing
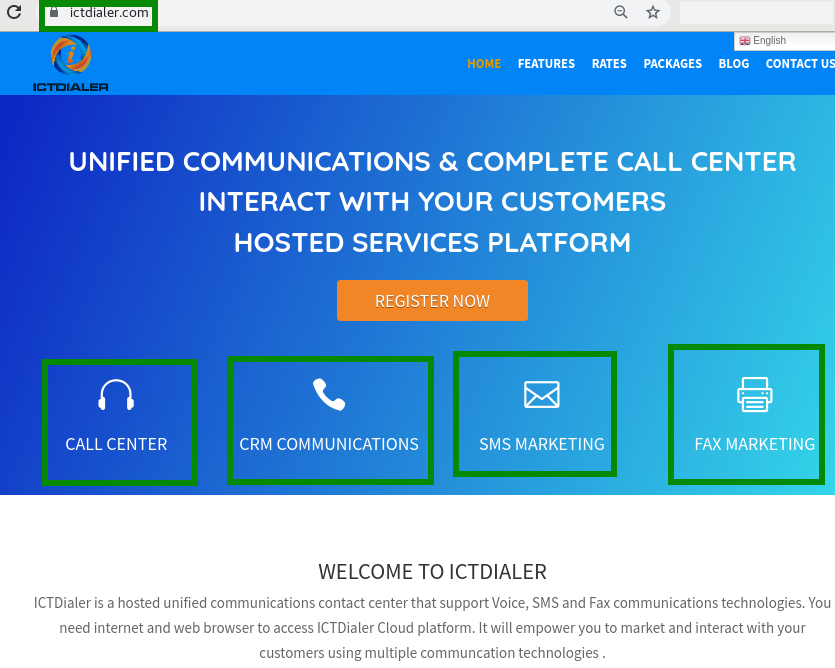
To approach registration form click any of given options.
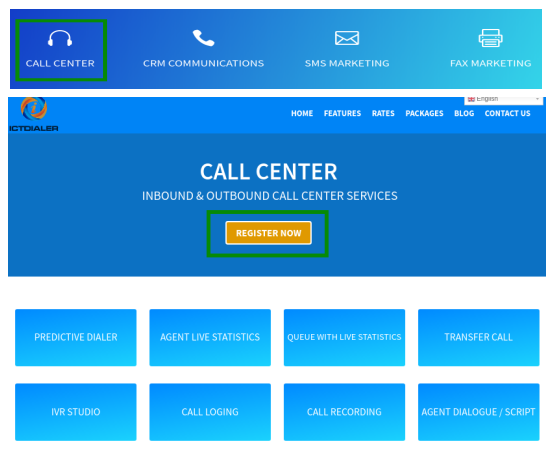
Click on “Call Centre”,
Click on register now button, it leads to next page for further procedure
Enter the required information, configure your desired options for cloud call center.
Enter personal information and billing details.
Must enter phone number for account verification.
Click on continue button as shown below:
1.2. Setup
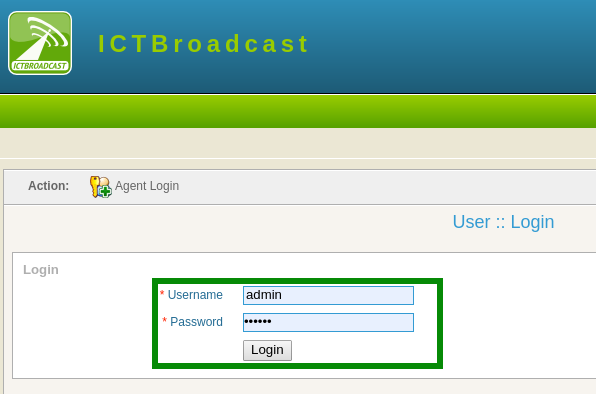
After completing registration procedure user will login to the main system. Before starting campaign
user will configure contacts list that will be used in campaign.
Contact groups:
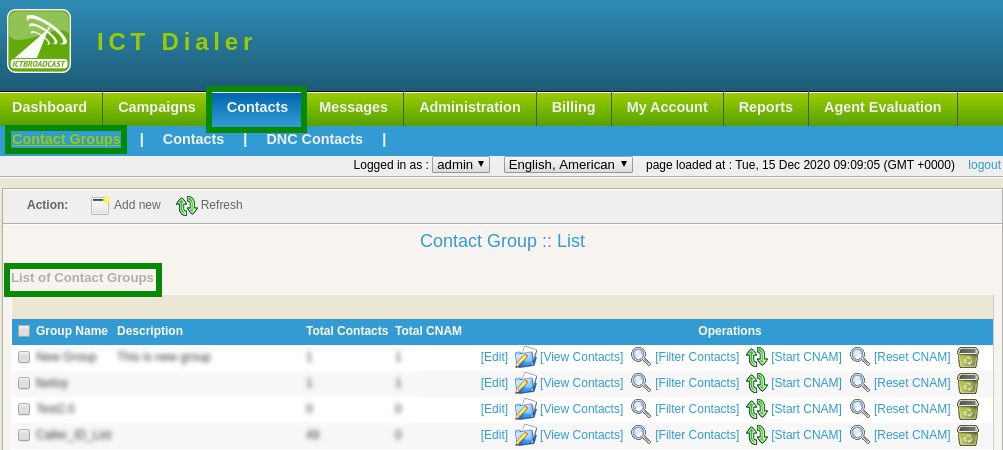
Click on contacts menu from main menu
Click on contact groups sub-menu
User can view list of contact groups and details will display on screen.
Click on edit button to change/update information in contact groups as shown below:
To Add New Contact Group:
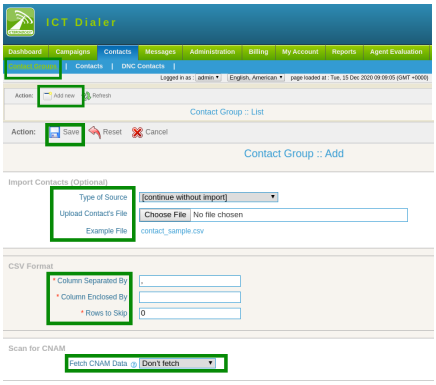
Click on Add New button to enter new contact group in system.
Type contact group title and description in text box
Click on drop-down to select type of source to import contacts from list.
Click on save button
Contacts:
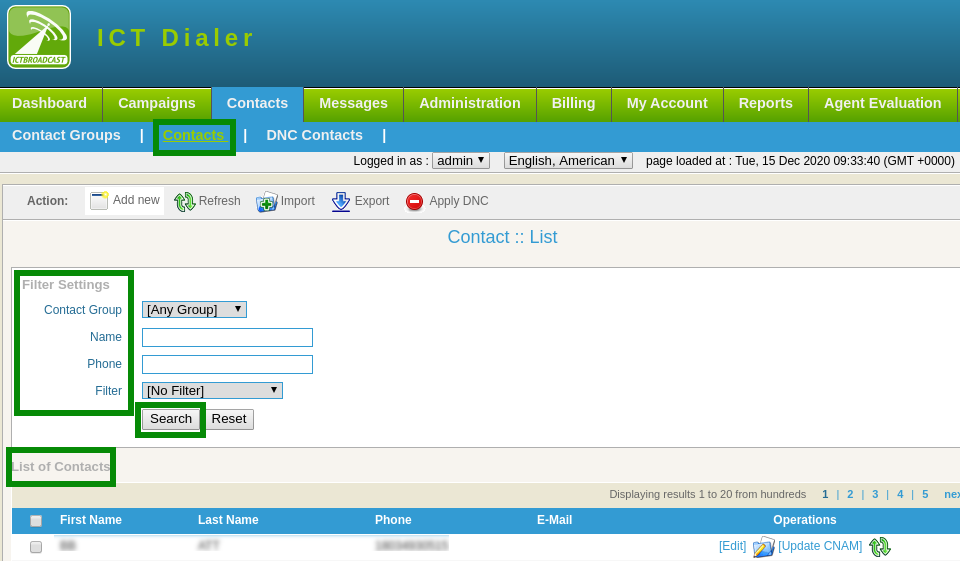
Click on contacts sub-menu
Contact list will display on page. To check contact details set filler settings.
Select contact group from drop-down list
Click on search button as shown below:
To Add New Contacts:
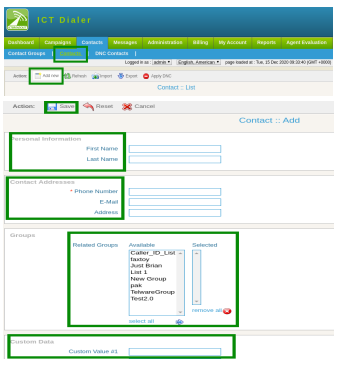
Click on “Add New” button, a page will open that have required information.
Enter personal information
Enter Contact Addresses
If any contact required from existing groups, select groups from available list
Click on save to complete the task as shown below:
DNC Contacts:
Click on DNC Contact sub-menu, a list of DNC contacts will display
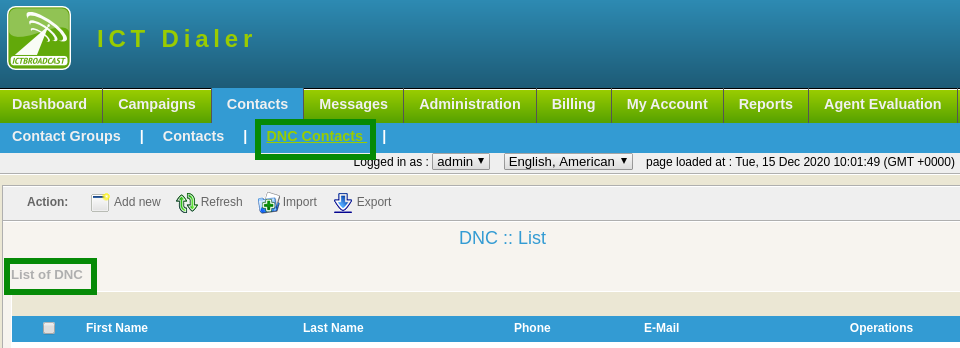
To Add New DNC Contact:
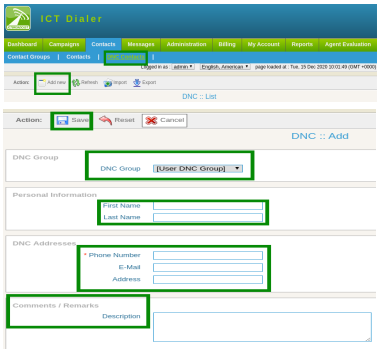
Click on Add New button
Select DNC group from drop-down list
Enter personal information: first name, last name
Enter DNC address: Phone number, email address
Type comments/remarks in description box
Click on save button to confirm the task as shown below:
Messages:
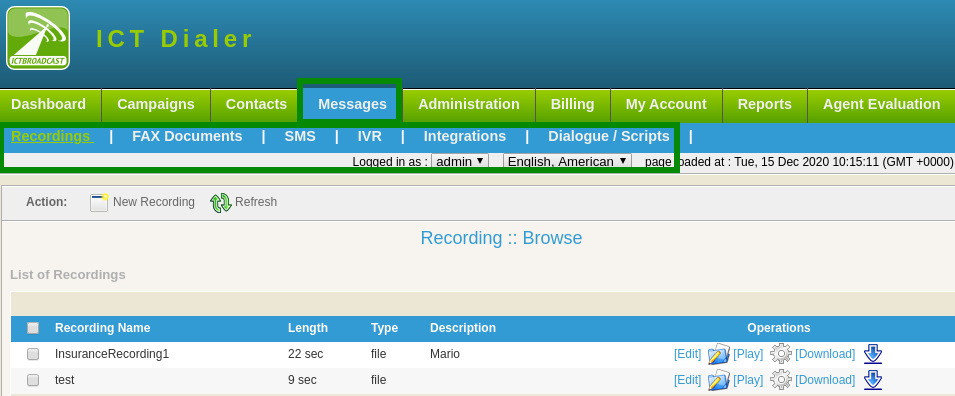
Click on messages from main menu, following sub-menus related to messages are mentioned that
required. These messages will be used when user need to create a campaign as shown:
Recordings:
Click on recordings sub-menu, a list of recordings will display. User can change information by clicking
edit button as shown:
To Add New Recordings:
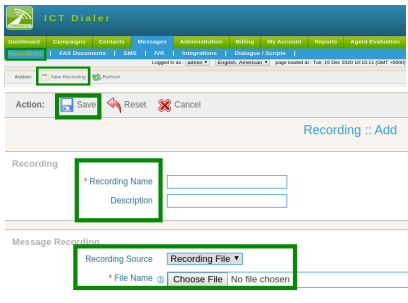
Click on New Recording button, a form will appear enter the required fields
Type recording name and description in text box
Select recording source from drop-down list
Click on choose file button, select file from device as shown:
Click on save button to complete task.
1.3. Running the campaigns:
User can manage call center campaign by configuring the requirements as it is predictive dialer that
dial numbers from contact list and on answer by the recipient, directly forward call to agent/external
call center/IVR system. Follow the below steps to run campaign:
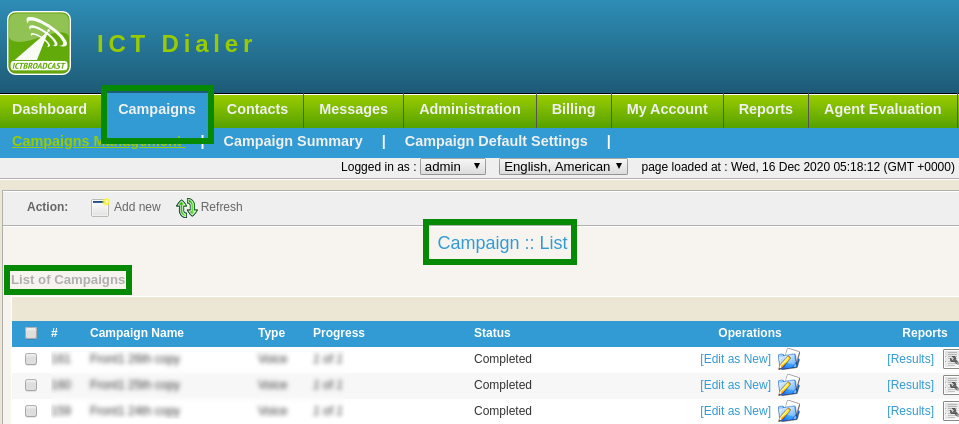
Click on Campaigns from main-menu, list of campaigns will display.
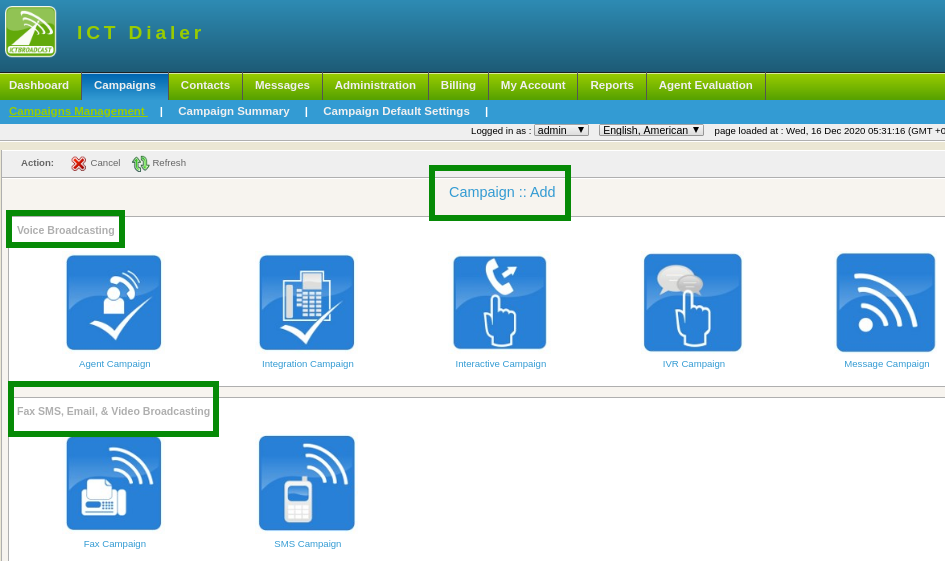
Following categories of campaigns are available. User can select the desired campaign to run that is according
to need they are:
Agent Campaign
Fax Campaign
Sms Campaign
Interactive Campaign
Press 1 Campaign
Click on “Add New” button, categories of campaigns will display on page.
1.4. To Create New Campaign:
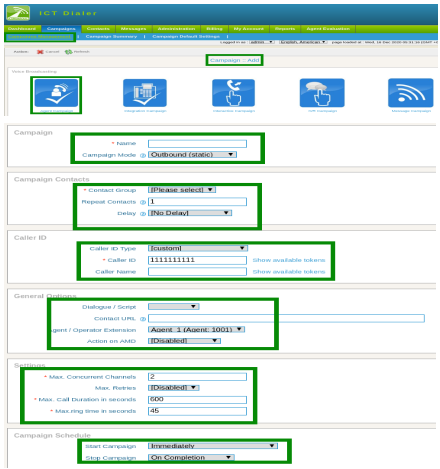
Click on agent campaign, a form will open that contains requirement field and settings for creating this
campaign.
Enter the requirements that are follows:
Campaign name: For identification of in summary
Campaign mode: select option from drop-down- inbound/outbound campaign
Campaign contacts:
Select contact group from drop-down
Caller ID Type:
Select Caller id type from drop-down
Caller ID
Enter caller IDCaller Name:
Enter the name of caller
General Options:
select dialogue/script from drop-down if have.
Enter contact url in field box. It shows caller detail when agent enter in system. Agent can edit any information
about caller if it is required.
Agent/Operator Extension:
Select single agent/extension or make list agents/extensions in queue from available list in drop-down. When
call is placed the extension forwarded to agents.
Action on AMD:
Select action from drop-down, when it is disabled it ignores answering machine. On hangup it detect AMD if
found then hangup the call otherwise continue normally. When leave a message is selected it detects AMD if
found then play a different message.
Settings:
Set maximum concurrent channels
Set maximum call retires to contacts
Set maximum call duration to engage
Set maximum ring time in seconds, if in set time call is entertained then it stop.
Campaign Schedule:
Set campaign start time from drop-down,
→ start campaign immediately
→ On scheduled time according to select date and time
Set campaign stop time from drop-down
→ to stop when it is completed
→ On scheduled time according selected date and time
3 rd part integration:
Set Request call end when call to be ended.
1.5. Reports:
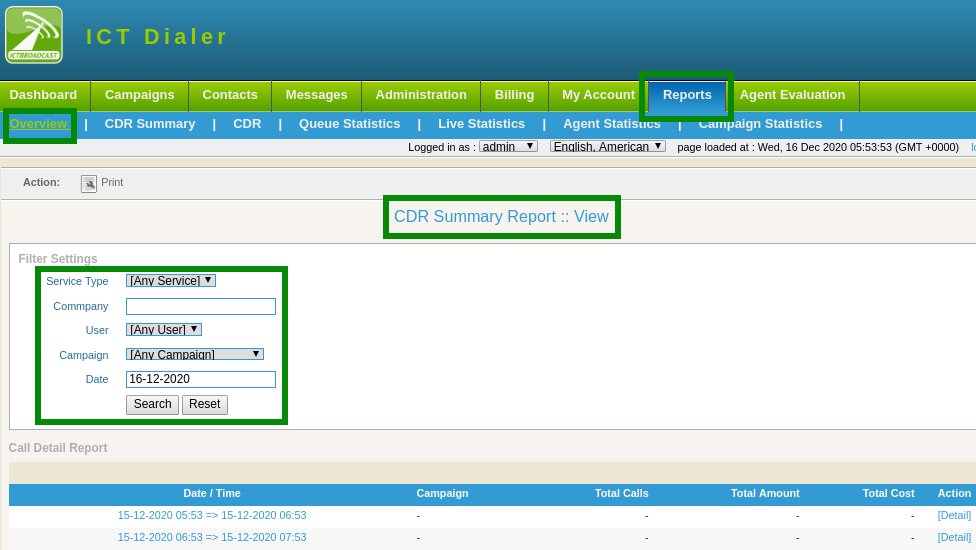
To view call detail record and details.
Click on reports option from main-menu
Click on overview sub-menu, a page will open required fields.
Select service type from drop-down.
Type company in text-box
Select user from drop-down
Enter date/time
Hit search button as shown below:
CDR Summary:
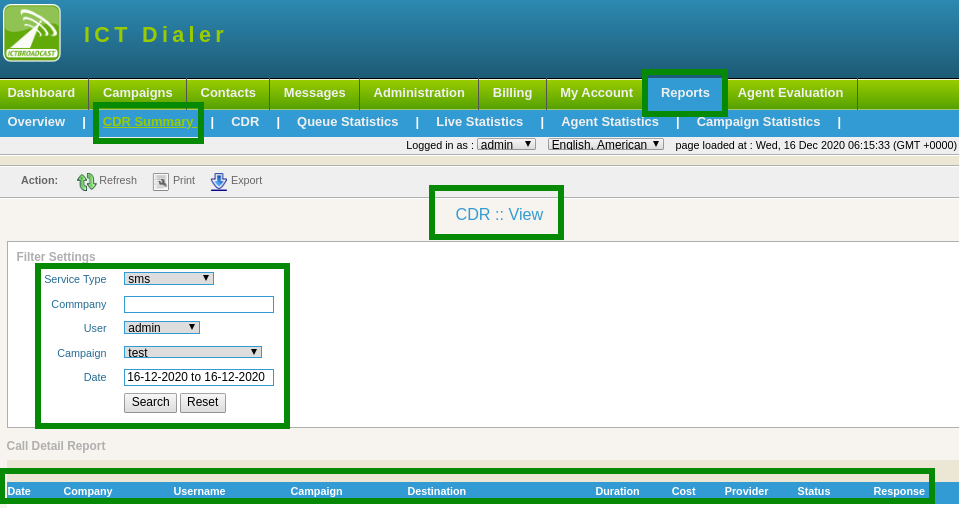
CDR summary provides user a chart view of campaign status. To check CDR(call detail record)
summary of campaign like (company name, user name, campaign, destination, status etc).
Click on CDR summary sub-menu.
Set filer settings, click on search button to view the detail as shown below:
CDR:
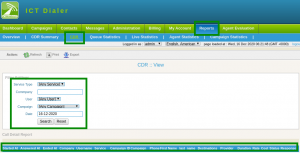
To check details about every call placed by a campaign.
Click on CDR sub-menu
Set filer settings, click on search button to view the detail as shown below:
Queue Statistics:
To check details about agents in queue like (offline agents, ready agents, etc )
Click on queue statistics sub-menu
Click on live statistics sub-menu, list of queue statistics will display on page as shown below:

Live Statistics:
To view agents details like (when agent logged in, login age, operations etc)
Click on live statistics sub-menu, list of live statistics will display on page as shown below:

Agents Statistics:
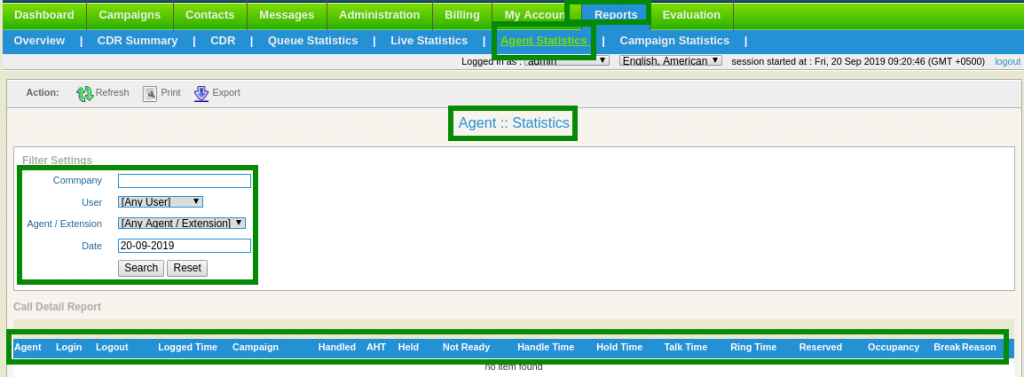
To check overall summary of agents, click on agents statistics sub-menu
Set filer settings, select desired agent from drop-down.
Click on search button to view the detail as shown below:
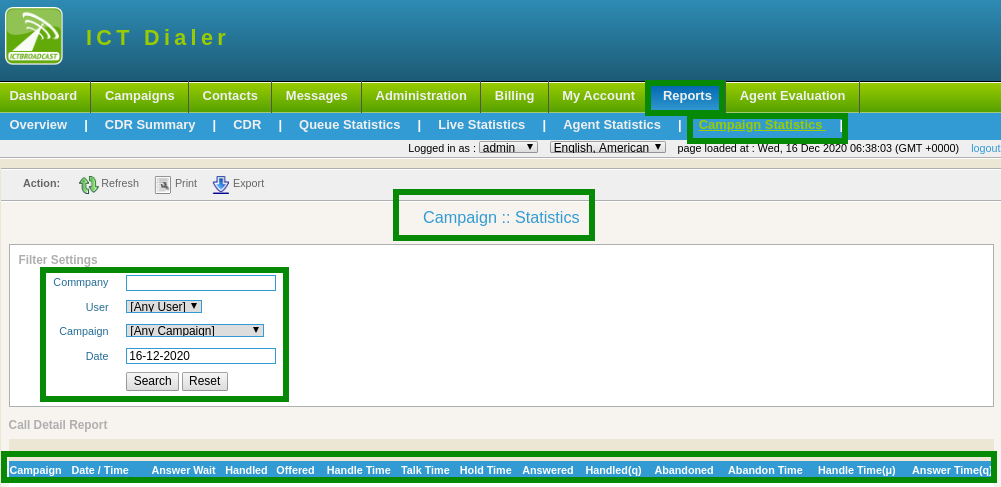
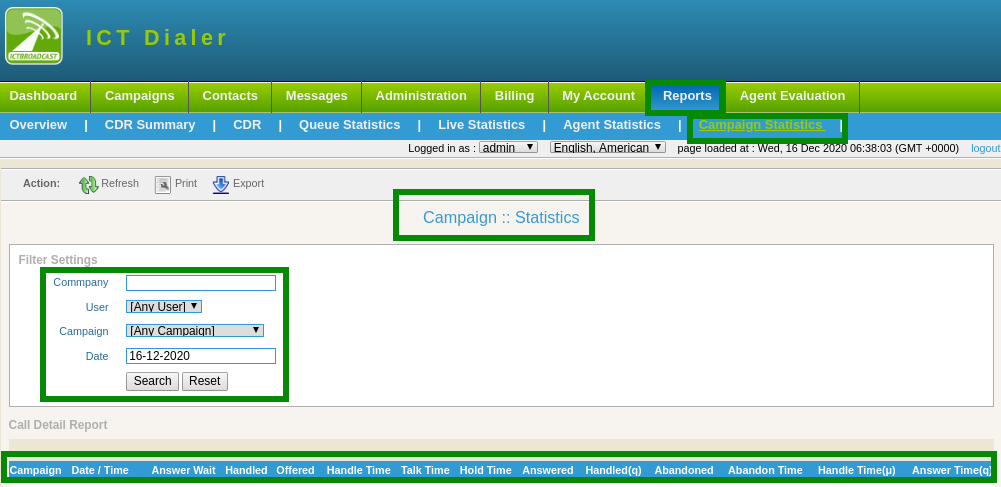
Campaign Statistics:
To check details of each campaign,click on campaign sub-menu.
set filer settings, select desired campaign from drop-down to see results according to need and
requirements as shown below:
2.CRM COMMUNICATION USER GUIDE
2.1. Registration:
To get crm communication services follow the steps below:
Open web-browser, use the given link https://ictdialer.com to visit the website as display below:
Following blurbs are shown on main page of web-page, they are named as:Call Center
CRM Communication
SMS Marketing
Fax Marketing
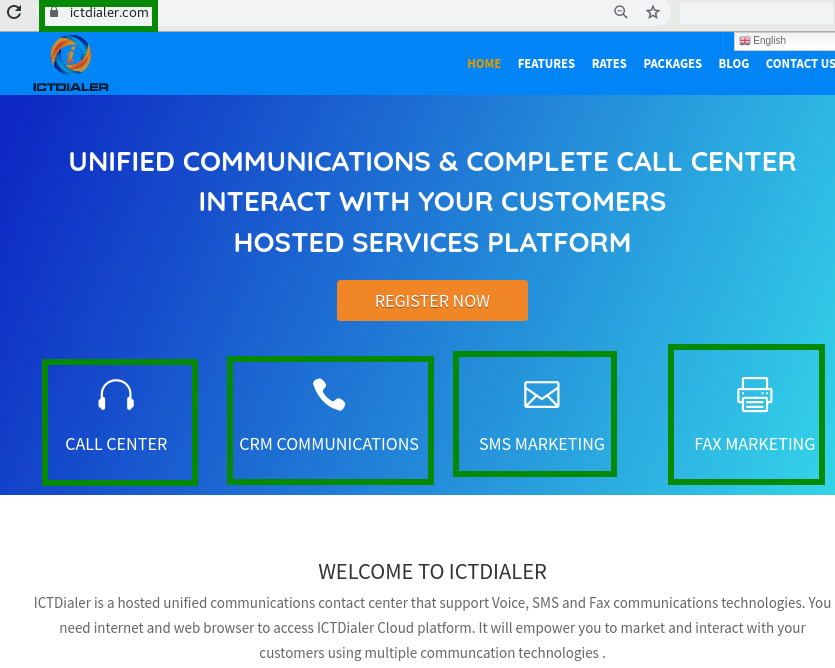
To approach registration form click any of given options.
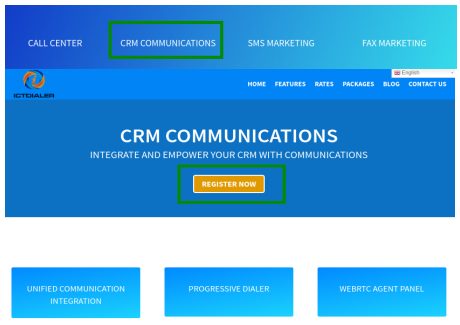
Click on “CRM Communications”,
Click on register now button, it leads to next page for further procedure
Enter the required information, configure your desired options for cloud call center.
Enter personal information and billing details.
Must enter phone number for account verification.
1. Click on continue button as shown below:
2.2. Setup:
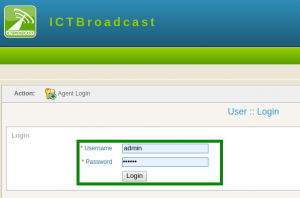
After completing registration procedure user will login to the main system. Before starting campaign
user will configure contacts list that will be used in campaign.
Contact groups:
Click on contacts menu from main menu
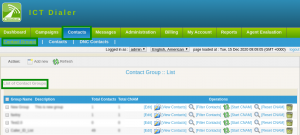
Click on contact groups sub-menu
User can view list of contact groups and details will display on screen.
Click on edit button to change/update information in contact groups as shown below:
To Add New Contact Group:
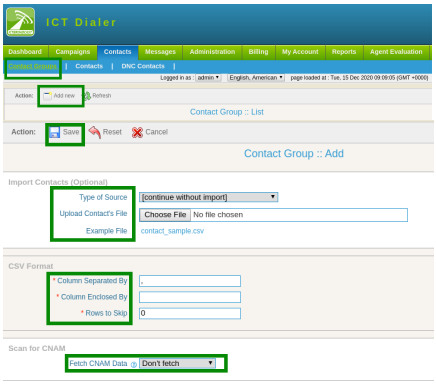
Click on Add New button to enter new contact group in system.
Type contact group title and description in text box
Click on drop-down to select type of source to import contacts from list.
Click on save button
Contacts:
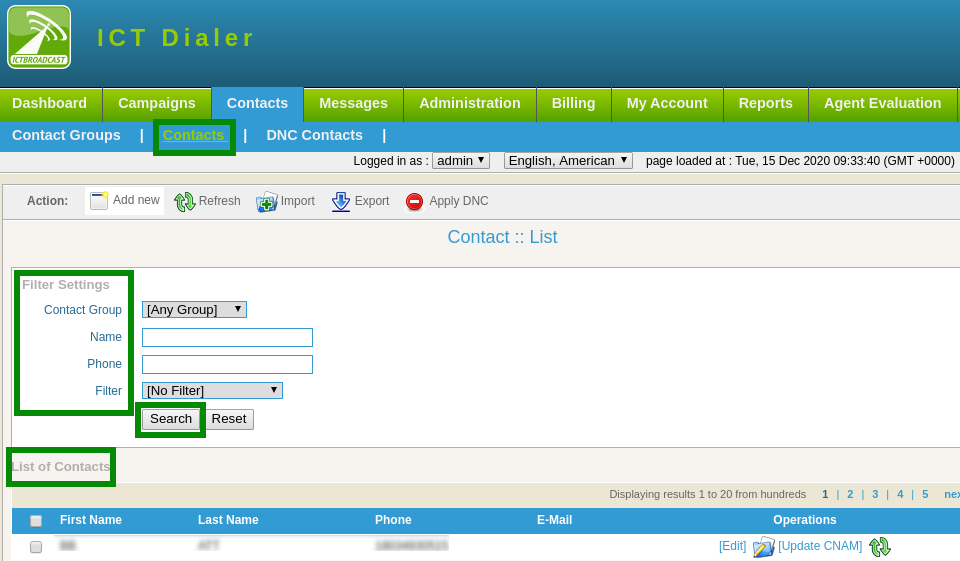
Click on contacts sub-menu
Contact list will display on page. To check contact details set filler settings.
Select contact group from drop-down list
Click on search button as shown below:
To Add New Contacts:
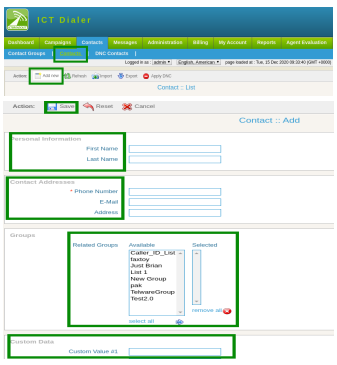
Click on “Add New” button, a page will open that have required information.
Enter personal information
Enter Contact Addresses
If any contact required from existing groups, select groups from available list
Click on save to complete the task as shown below:
DNC Contacts:
Click on DNC Contact sub-menu, a list of DNC contacts will display
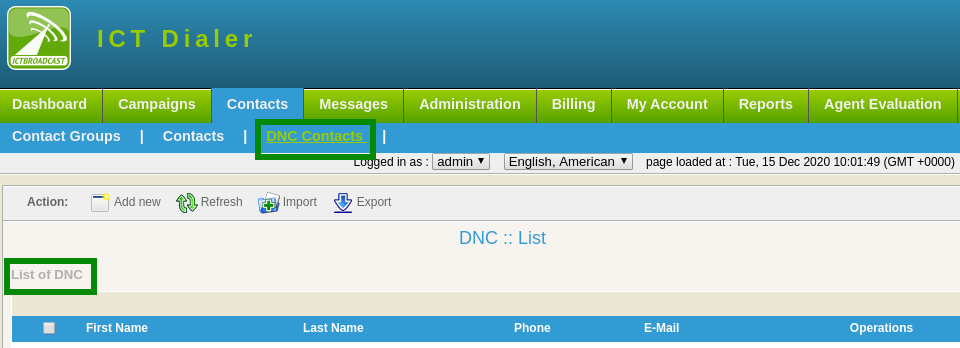
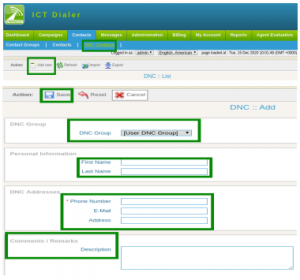
To Add New DNC Contact:
Click on Add New button
Select DNC group from drop-down list
Enter personal information: first name, last name
Enter DNC address: Phone number, email address
Type comments/remarks in description box
Click on save button to confirm the task as shown below:
Messages:
Click on messages from main menu, following sub-menus related to messages are mentioned that
required. These messages will be used when user need to create a campaign as shown:
Recordings:
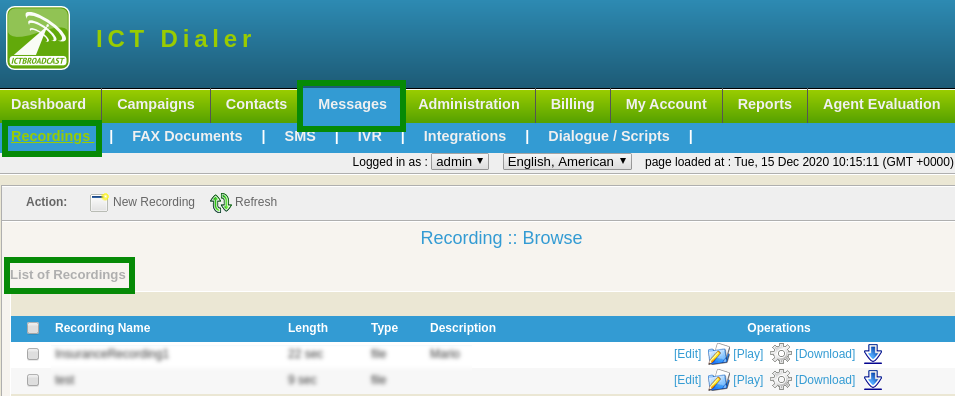
Click on recordings sub-menu, a list of recordings will display. User can change information by clicking
edit button as shown:
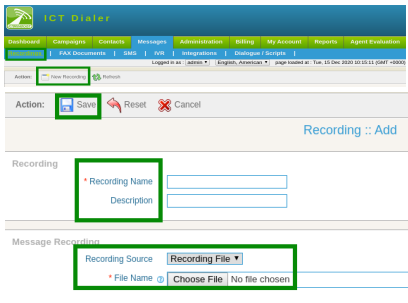
To Add New Recordings:
Click on New Recording button, a form will appear enter the required fields
Type recording name and description in text box
Select recording source from drop-down list
Click on choose file button, select file from device as shown:
Click on save button to complete task.
2.3. Running the campaigns:
User can manage call center campaign by configuring the requirements as it is predictive dialer that
dial numbers from contact list and on answer by the recipient, directly forward call to agent/external
call center/IVR system. Follow the below steps to run campaign:
Click on Campaigns from main-menu, list of campaigns will display.
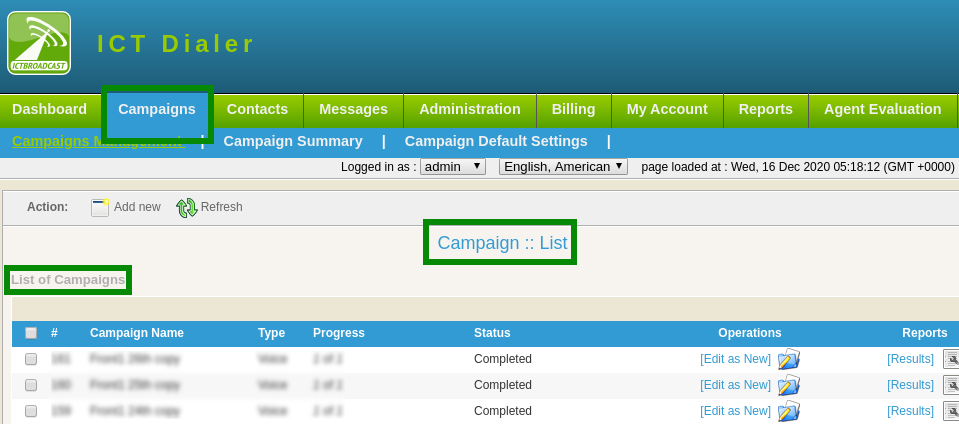
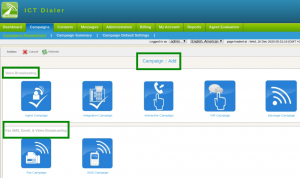
Following categories of campaigns are available. User can select the desired campaign to run that is according
to need they are:
Agent Campaign
Fax Campaign
Sms Campaign
Interactive Campaign
Press 1 Campaign
Click on “Add New” button, categories of campaigns will display on page.
2.4. To Create New Campaign:
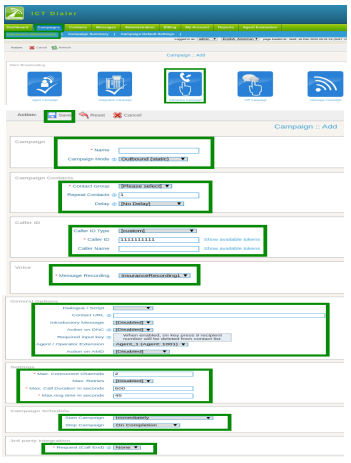
Click on agent campaign, a form will open that contains requirement field and settings for creating this
campaign.
Enter the requirements that are follows:Campaign name: For identification of in summary
Campaign mode: select option from drop-down- inbound/outbound campaign
Campaign contacts:
Select contact group from drop-down
Caller ID Type:
Select Caller id type from drop-down
Caller ID
Enter caller ID
Caller Name:
Enter the name of caller
General Options:
select dialogue/script from drop-down if have.
Enter contact url in field box. It shows caller detail when agent enter in system. Agent can edit any information
about caller if it is required.
Agent/Operator Extension:
Select single agent/extension or make list agents/extensions in queue from available list in drop-down. When
call is placed the extension forwarded to agents.
Action on AMD:
Select action from drop-down, when it is disabled it ignores answering machine. On hangup it detect AMD if
found then hangup the call otherwise continue normally. When leave a message is selected it detects AMD if
found then play a different message.
Settings:
Set maximum concurrent channels
Set maximum call retires to contacts
Set maximum call duration to engage
Set maximum ring time in seconds, if in set time call is entertained then it stop.
Campaign Schedule:
Set campaign start time from drop-down,
→ start campaign immediately
→ On scheduled time according to select date and time
Set campaign stop time from drop-down
→ to stop when it is completed
→ On scheduled time according selected date and time3 rd part integration:
Set Request call end when call to be ended.
2.5. Reports:
To view call detail record and details.
Click on reports option from main-menu
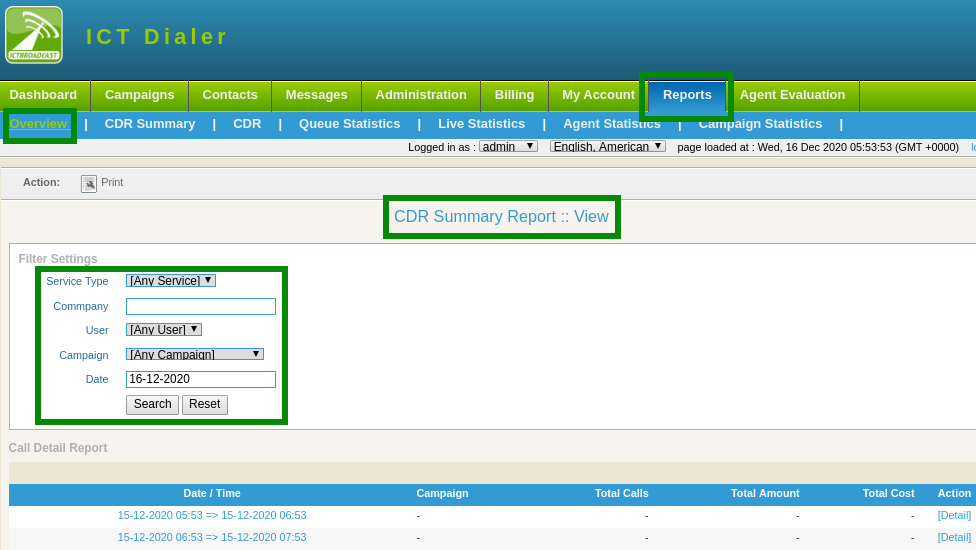
Click on overview sub-menu, a page will open required fields.
Select service type from drop-down.
Type company in text-box
Select user from drop-down
Enter date/time
Hit search button as shown below:
CDR Summary:
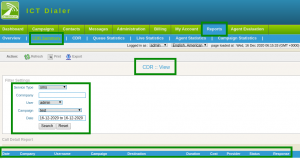
CDR summary provides user a chart view of campaign status. To check CDR(call detail record)
summary of campaign like (company name, user name, campaign, destination, status etc).
Click on CDR summary sub-menu.
Set filer settings, click on search button to view the detail as shown below:
CDR:
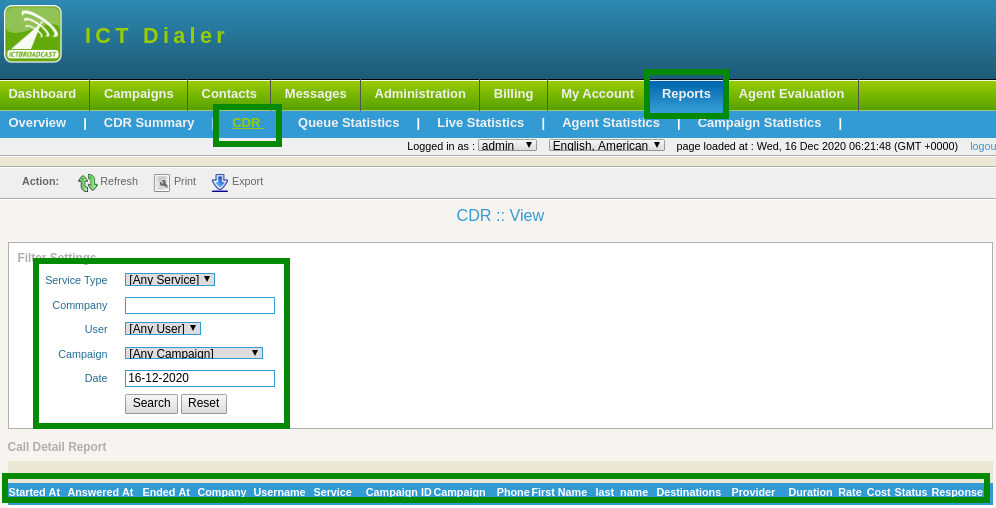
To check details about every call placed by a campaign.
Click on CDR sub-menu
Set filer settings, click on search button to view the detail as shown below:
Queue Statistics:
To check details about agents in queue like (offline agents, ready agents, etc )
Click on queue statistics sub-menu
Click on live statistics sub-menu, list of queue statistics will display on page as shown below:

Live Statistics:
To view agents details like (when agent logged in, login age, operations etc)
Click on live statistics sub-menu, list of live statistics will display on page as shown below:

Agents Statistics:
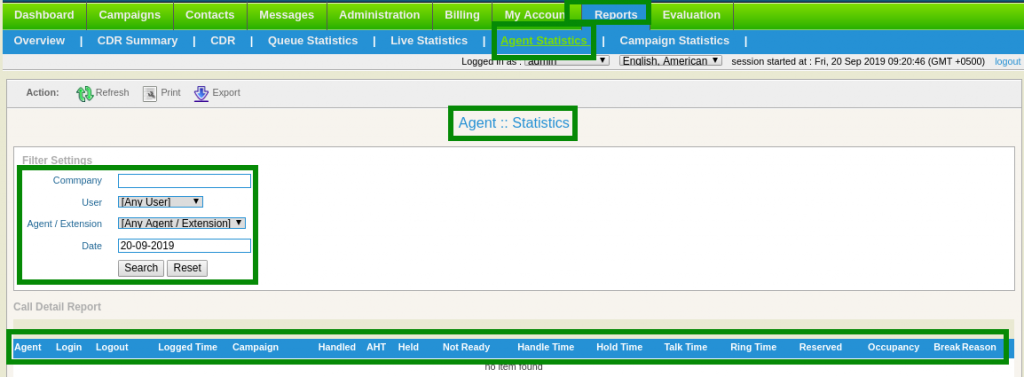
To check overall summary of agents, click on agents statistics sub-menu
Set filer settings, select desired agent from drop-down.
Click on search button to view the detail as shown below:
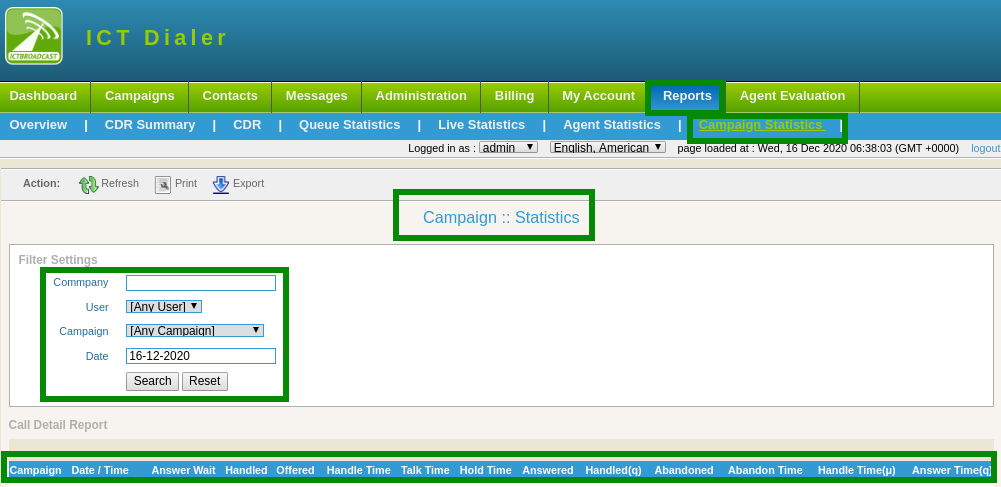
Campaign Statistics:
To check details of each campaign,click on campaign sub-menu.
set filer settings, select desired campaign from drop-down to see results according to need and
requirements as shown below:
3.SMS MARKETING USER GUIDE
3.1. Registration:
To get sms marketing services follow the steps below:
Open web-browser, use the given link https://ictdialer.com to visit the website as display below:Following blurbs are shown on main page of web-page, they are named as:
Call Center
CRM Communication
SMS Marketing
Fax Marketing
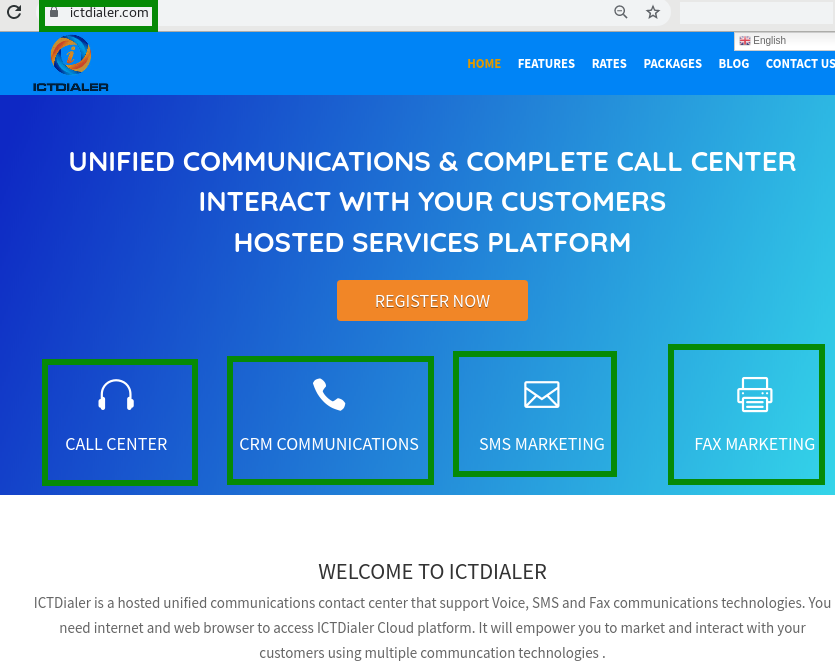
To approach registration form click any of given options.
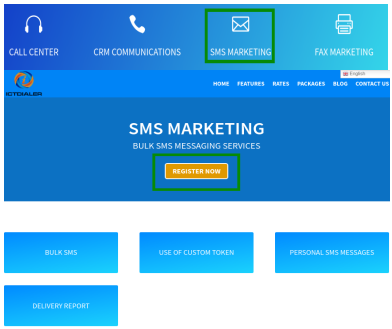
Click on “SMS Marketing”,
Click on register now button, it leads to next page for further procedure
Enter the required information, configure your desired options for cloud call center.
Enter personal information and billing details.
Must enter phone number for account verification.
Click on continue button as shown below:
3.2. Setup:
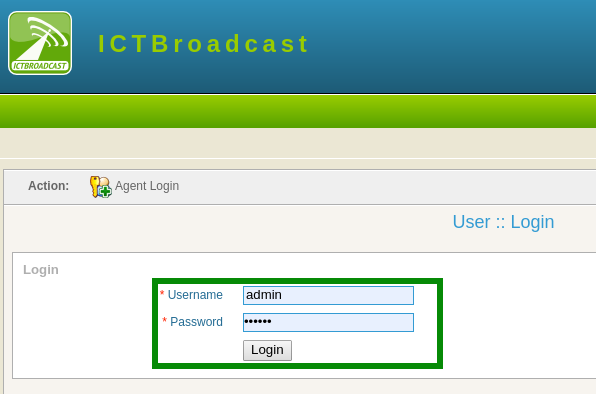
After completing registration procedure user will login to the main system. Before starting campaign
user will configure contacts list that will be used in campaign.
Contact groups:
Click on contacts menu from main menu
Click on contact groups sub-menu
User can view list of contact groups and details will display on screen.
Click on edit button to change/update information in contact groups as shown below:
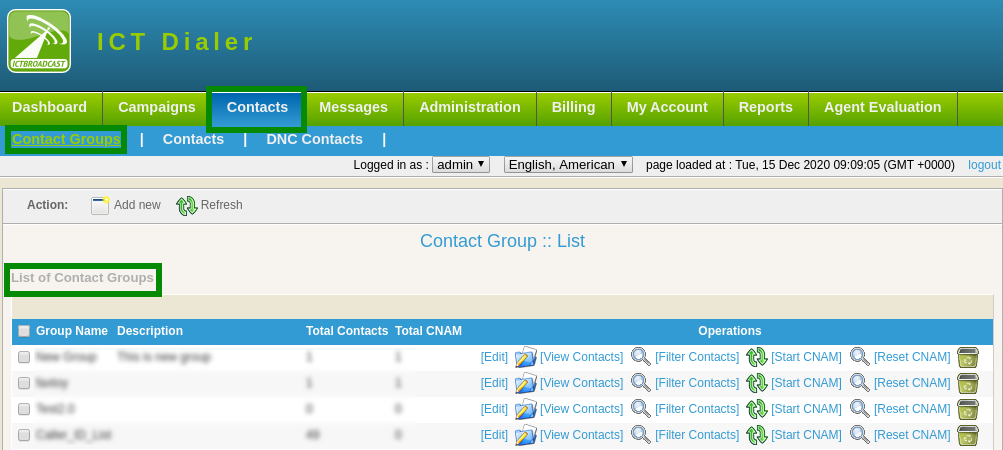
To Add New Contact Group:
Click on Add New button to enter new contact group in system.
Type contact group title and description in text boxClick on drop-down to select type of source to import contacts from list.
Click on save button

Contacts:
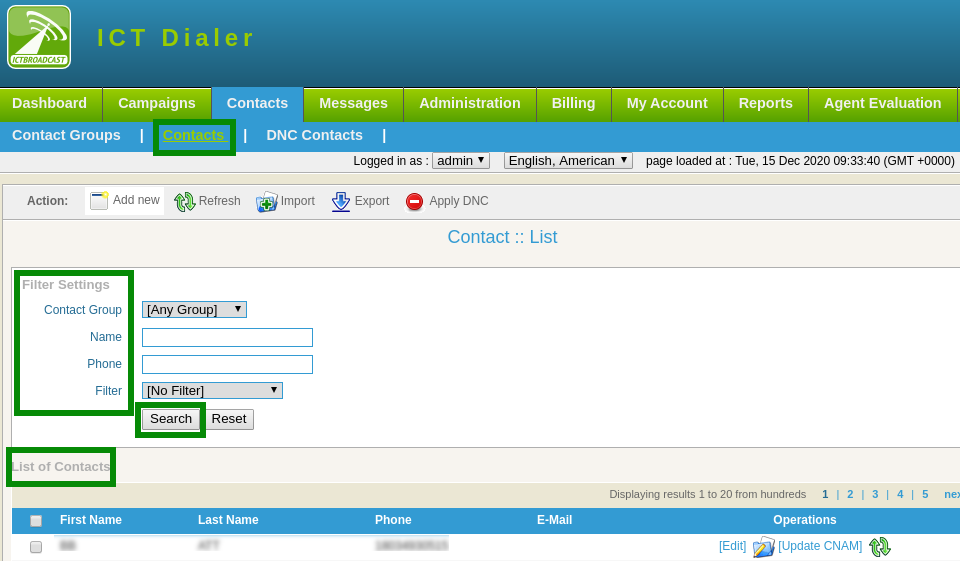
Click on contacts sub-menu
Contact list will display on page. To check contact details set filler settings.
Select contact group from drop-down list
Click on search button as shown below:
To Add New Contacts:
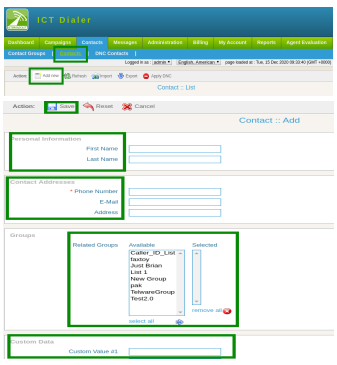
Click on “Add New” button, a page will open that have required information.
Enter personal information
Enter Contact AddressesIf any contact required from existing groups, select groups from available list
Click on save to complete the task as shown below:
DNC Contacts:
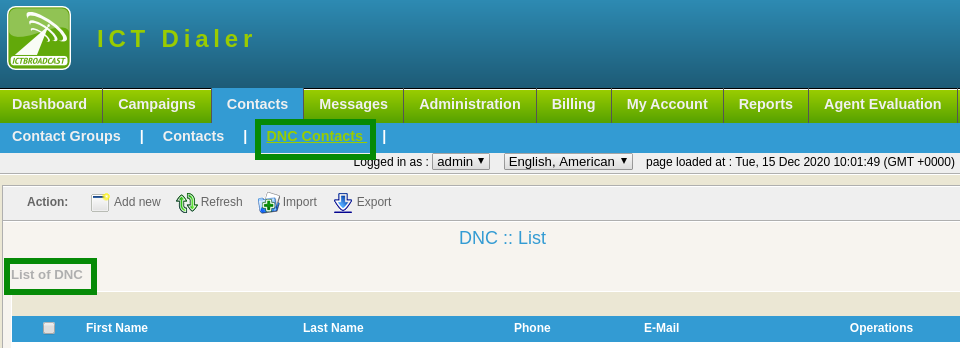
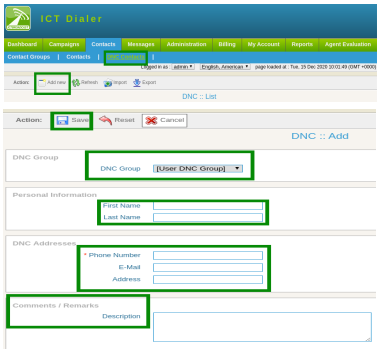
Click on DNC Contact sub-menu, a list of DNC contacts will display
To Add New DNC Contact:
Click on Add New button
Select DNC group from drop-down list
Enter personal information: first name, last name
Enter DNC address: Phone number, email address
Type comments/remarks in description box
Click on save button to confirm the task as shown below:
Messages:
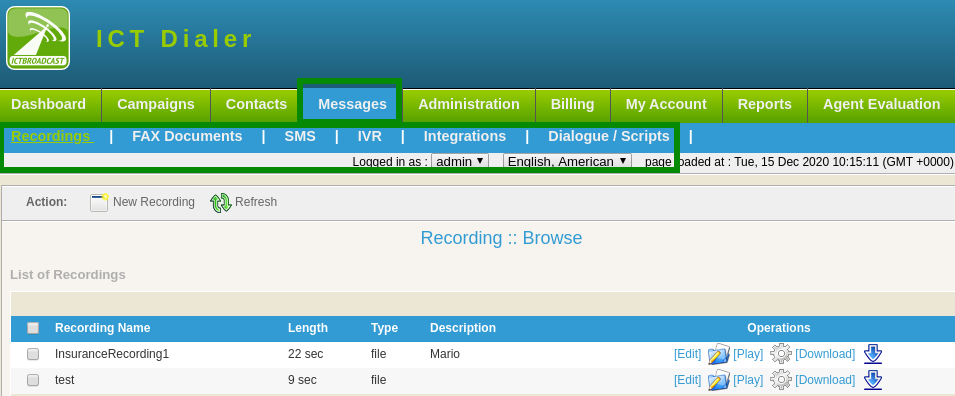
Click on messages from main menu, following sub-menus related to messages are mentioned that
required. These messages will be used when user need to create a campaign as shown:
SMS:
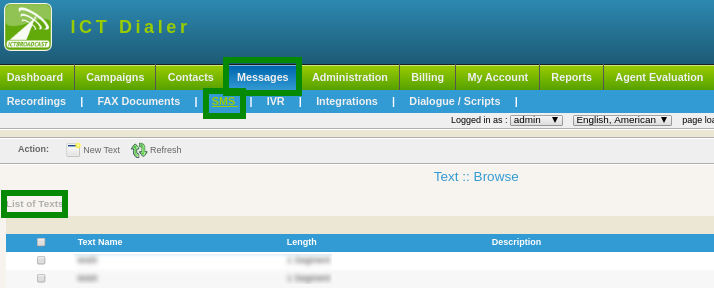
Click on SMS sub-menu, a list of recordings will display
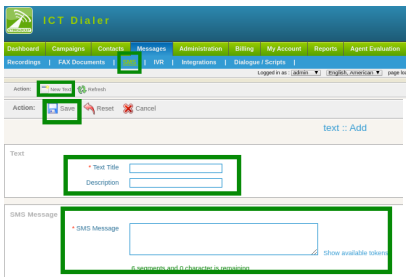
Click on New Text button, a form will appear enter the required fields
Type text title and description in text box
Type SMS Message in dialogue box that is being used in campaign
Click on save button to complete task.
3.3. Running the campaign:
SMS Campaign:
In sms campaign, dial numbers from contact list and send messages to all recipient.
SMS can be advertisement or public service message, it depends on user requirement.
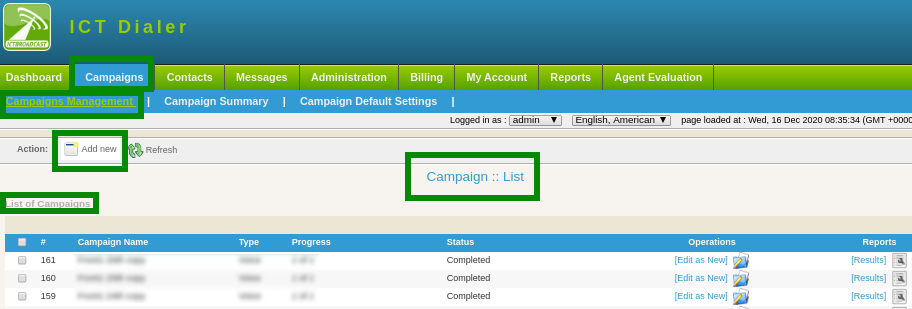
To start campaign, click on campaign management sub-menu.
Click on add new button.
3.4. To Create SMS Campaign:
Click on sms campaign from categories of campaigns.
A form will open that contains requirement field and settings for creating this campaign.
Enter the requirements that are follows:
Campaign name: For identification of in summary
Campaign mode: select option from drop-down- inbound/outbound campaign
Campaign contacts:
Select contact group from drop-down
Set call repeat contacts in field box
Set delay time from drop-down
Caller ID:
Caller ID Type: Select Caller id type from drop-down
Caller ID: Enter caller ID
Caller Name:Enter the name of caller
SMS:
Select your Text message from drop-down list that needs to run in campaign.
Campaign Schedule:
Set campaign start time from drop-down,
→ start campaign immediately
→ On scheduled time according to select date and time
Set campaign stop time from drop-down
→ to stop when it is completed
→ On scheduled time according selected date and time.

3.5. Reports:
To view call detail record and details.
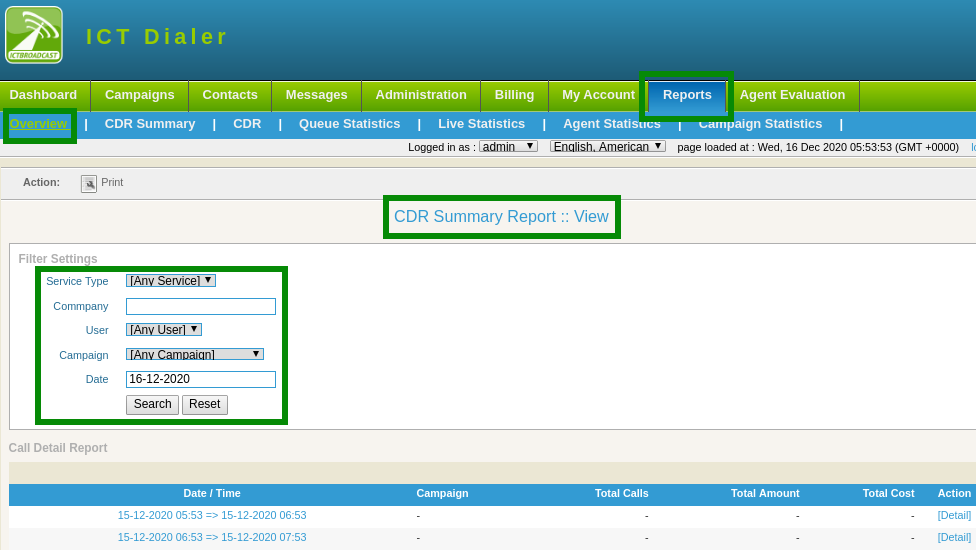
Click on reports option from main-menu
Click on overview sub-menu, a page will open required fields.
Select service type from drop-down.
Type company in text-box
Select user from drop-down
Enter date/time
Hit search button as shown below:
CDR Summary:
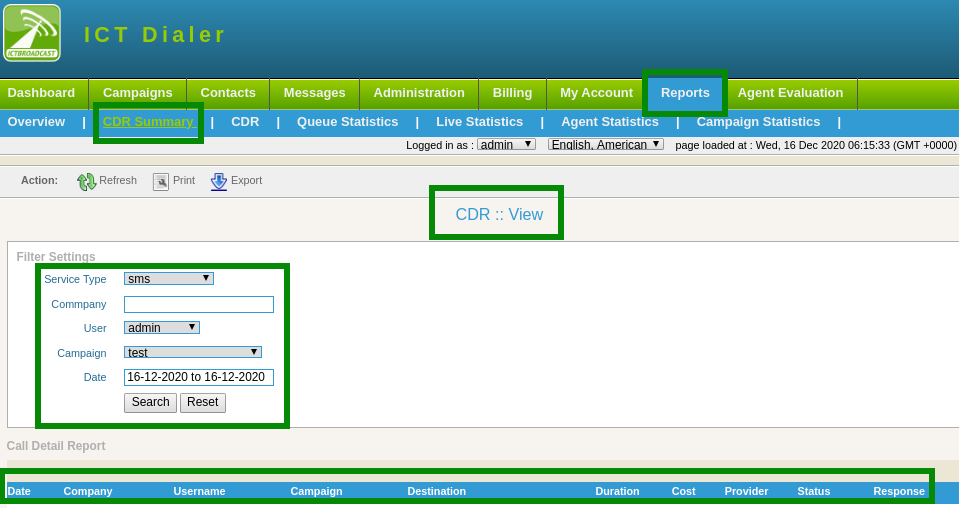
CDR summary provides user a chart view of campaign status. To check CDR(call detail record)
summary of campaign like (company name, user name, campaign, destination, status etc).
Click on CDR summary sub-menu.
Set filer settings, click on search button to view the detail as shown below:
CDR:
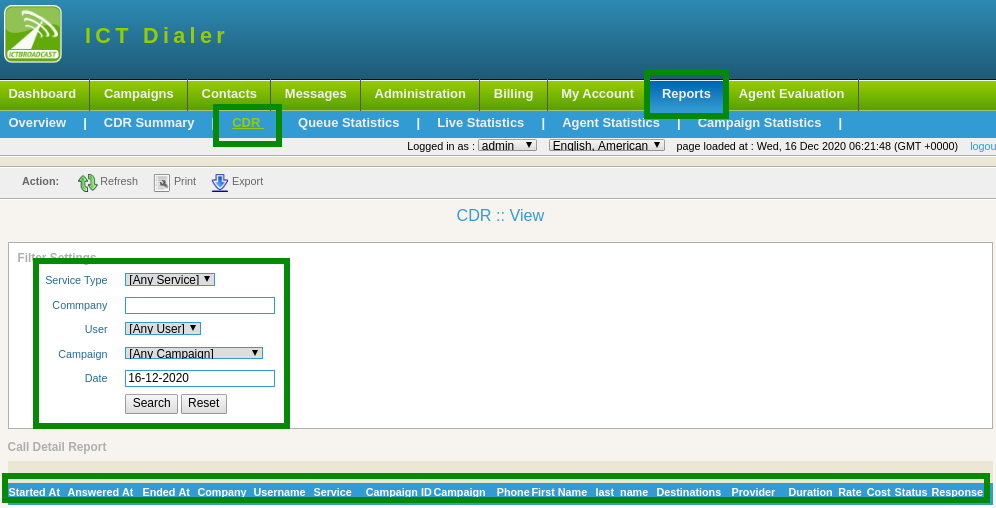
To check details about every call placed by a campaign.
Click on CDR sub-menu
Set filer settings, click on search button to view the detail as shown below:
Queue Statistics:
To check details about agents in queue like (offline agents, ready agents, etc )
Click on queue statistics sub-menu
Click on live statistics sub-menu, list of queue statistics will display on page as shown below:

Live Statistics:
To view agents details like (when agent logged in, login age, operations etc)
Click on live statistics sub-menu, list of live statistics will display on page as shown below:

Agents Statistics:
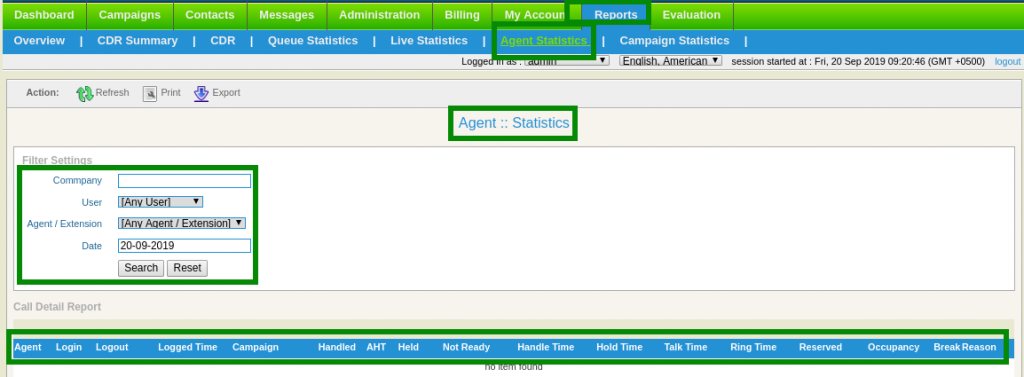
To check overall summary of agents, click on agents statistics sub-menu
Set filer settings, select desired agent from drop-down.
Click on search button to view the detail as shown below:
Campaign Statistics:
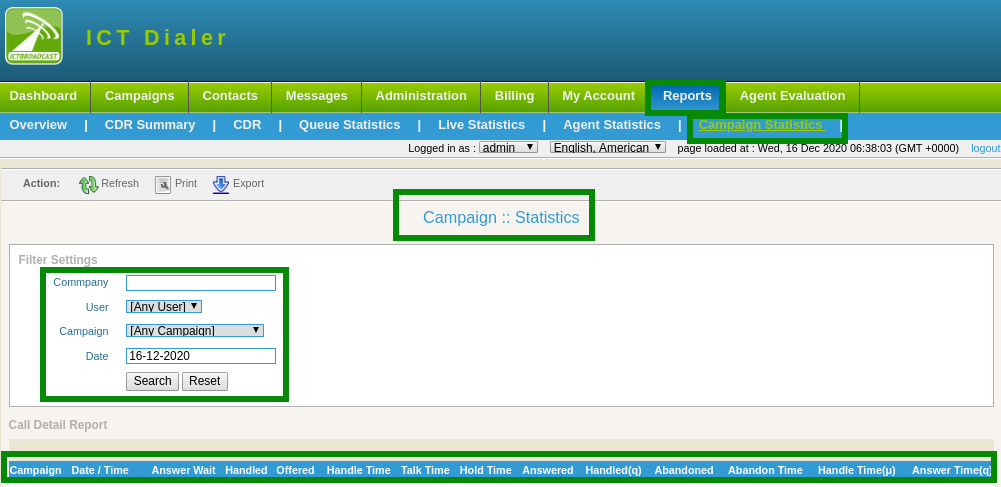
To check details of each campaign,click on campaign sub-menu.
set filer settings, select desired campaign from drop-down to see results according to need and
requirements as shown below:
4.FAX MARKETING USER GUIDE
4.1. Registration:
To get fax marketing services follow the steps below:
Open web-browser, use the given link https://ictdialer.com to visit the website as display below:
Following blurbs are shown on main page of web-page, they are named as:
Call Center
CRM Communication
SMS Marketing
Fax Marketing
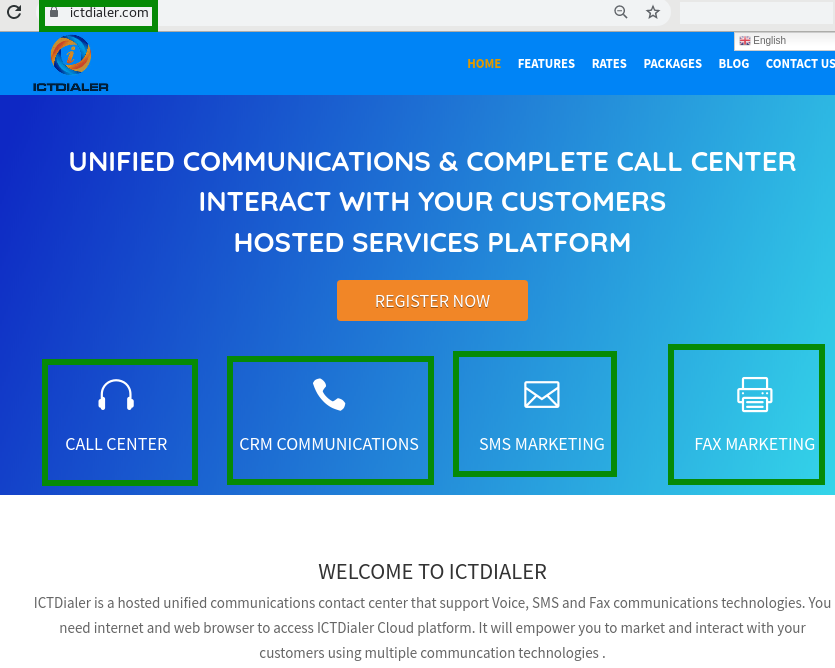
To approach registration form click any of given options.
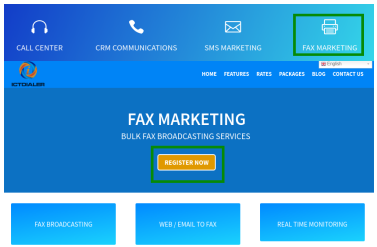
Click on “Fax Marketing”,
Click on register now button, it leads to next page for further procedure
Enter the required information, configure your desired options for cloud call center.
Enter personal information and billing details.
Must enter phone number for account verification.
Click on continue button as shown below:
4.2. Setup:
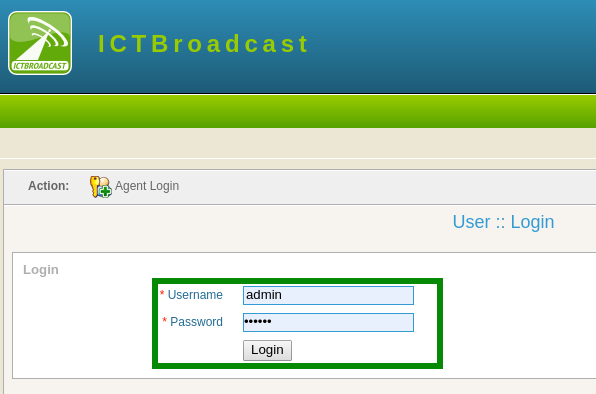
After completing registration procedure user will login to the main system. Before starting campaign
user will configure contacts list that will be used in campaign.\
Contact groups:
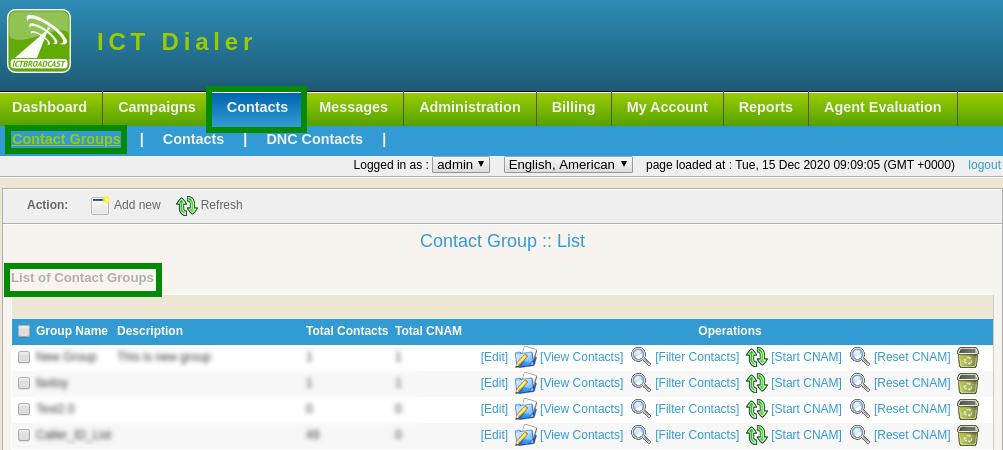
Click on contacts menu from main menu
Click on contact groups sub-menu
User can view list of contact groups and details will display on screen.
Click on edit button to change/update information in contact groups as shown below:
To Add New Contact Group:
Click on Add New button to enter new contact group in system.
Type contact group title and description in text box
Click on drop-down to select type of source to import contacts from list.
Click on save button

Contacts:
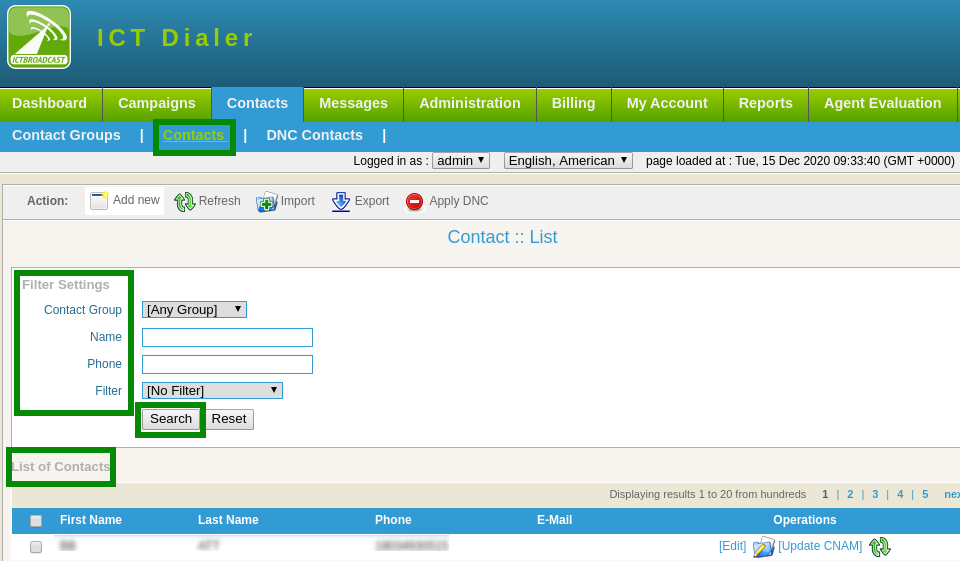
Click on contacts sub-menu
Contact list will display on page. To check contact details set filler settings.
Select contact group from drop-down list
Click on search button as shown below:
To Add New Contacts:
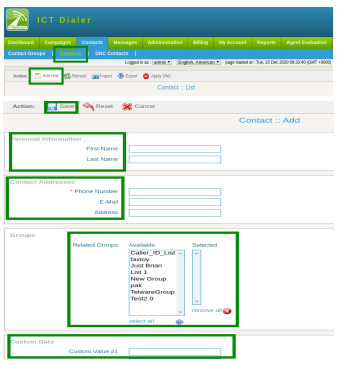
Click on “Add New” button, a page will open that have required information.
Enter personal information
Enter Contact Addresses
If any contact required from existing groups, select groups from available list
Click on save to complete the task as shown below:
DNC Contacts:
Click on DNC Contact sub-menu, a list of DNC contacts will display
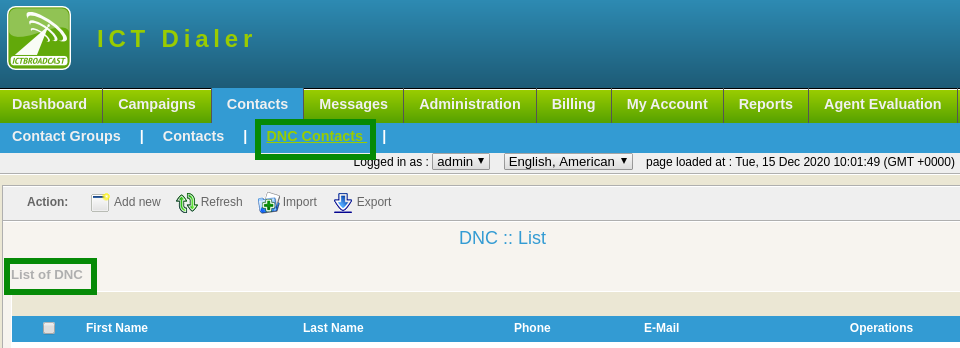
To Add New DNC Contact:
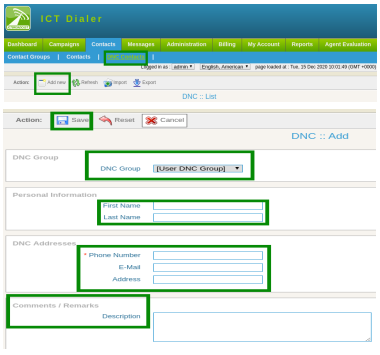
Click on Add New button
Select DNC group from drop-down list
Enter personal information: first name, last name
Enter DNC address: Phone number, email address
Type comments/remarks in description box
Click on save button to confirm the task as shown below:
Messages:
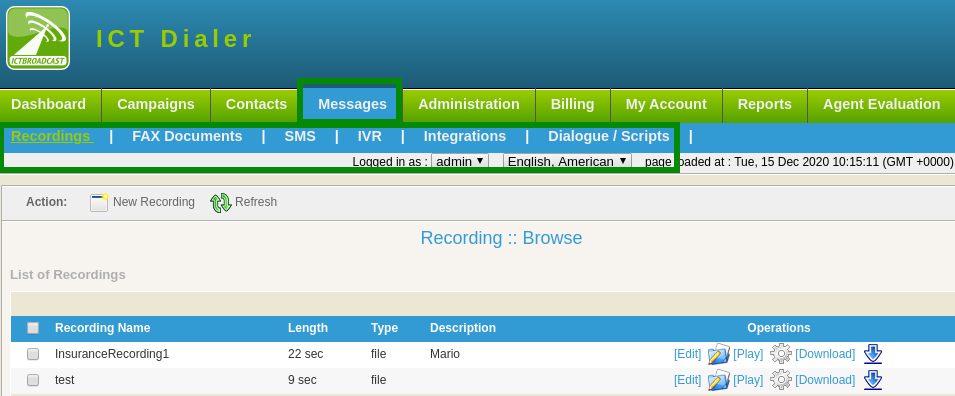
Click on messages from main menu, following sub-menus related to messages are mentioned that
required. These messages will be used when user need to create a campaign as shown:
Fax Documents:
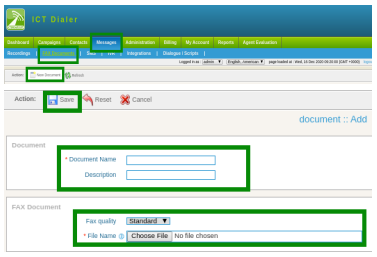
Click on Fax Document sub-menu, a list of recordings will display

Click on New Document button, a form will appear enter the required fields
Type document name and description in text box
Select fax quality from drop-down list
Click on choose file button, select file from device as shown:
Click on save button to complete task.
4.3. Running the campaign:
Fax Campaign:
In fax campaign, dial numbers from contact list, on answer by the recipient, transfer fax documents.
Fax document can in form of (text file, image file) it depends on user requirement.
To start campaign, click on campaign management sub-menu
Click on add new button.
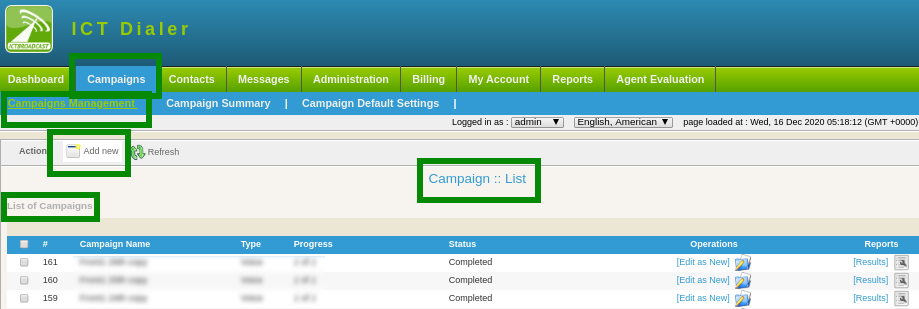
4.4. To Create Fax Marketing Campaign:
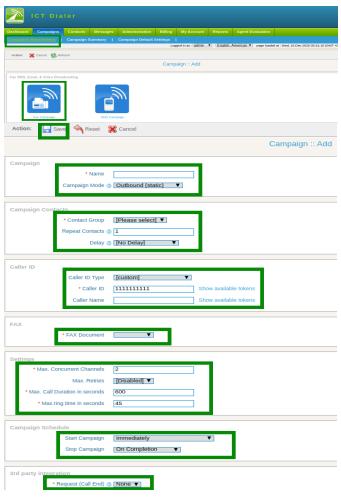
Click on fax campaign from categories of campaigns.
A form will open that contains requirement field and settings for creating this campaign.
Enter the requirements that are follows:
Campaign name: For identification of in summary
Campaign mode: select option from drop-down- inbound/outbound campaign
Campaign contacts:
Select contact group from drop-down
Set call repeat contacts in field box
Set delay time from drop-down
Caller ID Type:
Select Caller id type from drop-down
Caller ID
Enter caller ID
Caller Name:
Enter the name of caller
Fax Document: Select your fax document from drop-down list that needs to transfer.
Settings:
Set maximum concurrent channels in field box
Set maximum call retires to contacts. Select enable option from drop-down list. Otherwise select disabled.
Set maximum call duration to engage in field box
Set maximum ring time in seconds, if in set time call is entertained then it stop.
Campaign Schedule:
Set campaign start time from drop-down,
→ start campaign immediately
→ On scheduled time according to select date and time
Set campaign stop time from drop-down
→ to stop when it is completed
→ On scheduled time according selected date and time
3 rd part integration:
Set Request call end when call to be ended.
4.5. Reports:
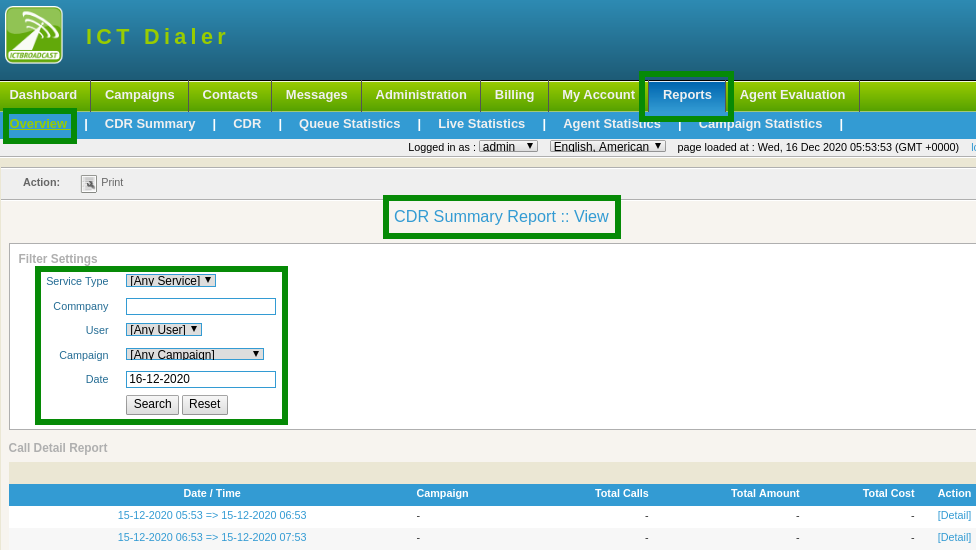
To view call detail record and details.
Click on reports option from main-menu
Click on overview sub-menu, a page will open required fields.
Select service type from drop-down.
Type company in text-box
Select user from drop-down
Enter date/time
Hit search button as shown below:
CDR Summary:
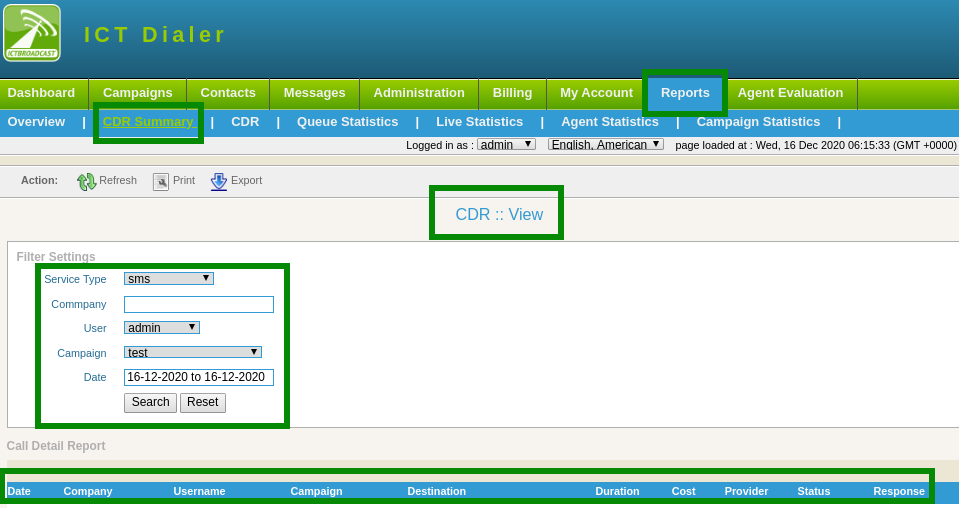
CDR summary provides user a chart view of campaign status. To check CDR(call detail record)
summary of campaign like (company name, user name, campaign, destination, status etc).
Click on CDR summary sub-menu.
Set filer settings, click on search button to view the detail as shown below:
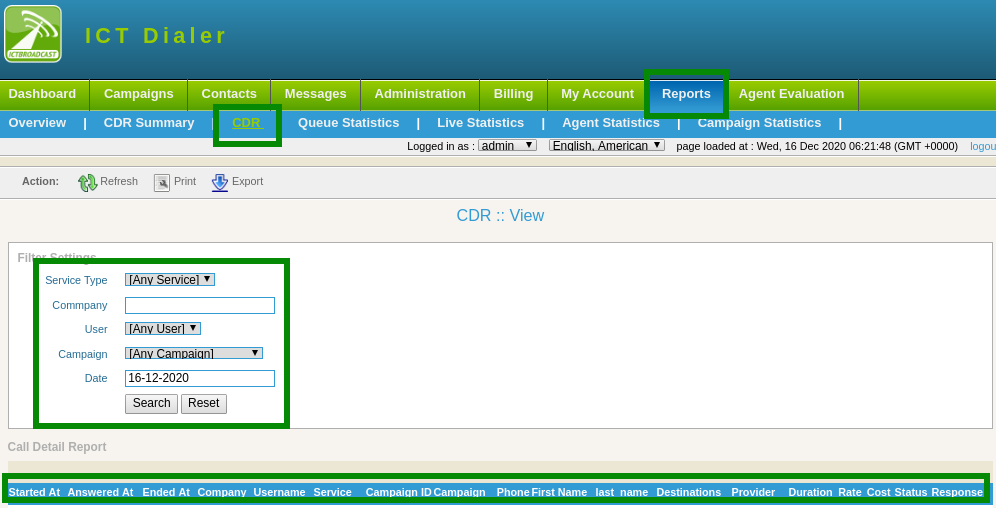
CDR:
To check details about every call placed by a campaign.
Click on CDR sub-menu
Set filer settings, click on search button to view the detail as shown below:
Queue Statistics:
To check details about agents in queue like (offline agents, ready agents, etc )
Click on queue statistics sub-menu
Click on live statistics sub-menu, list of queue statistics will display on page as shown below:

Live Statistics:
To view agents details like (when agent logged in, login age, operations etc)
Click on live statistics sub-menu, list of live statistics will display on page as shown below:

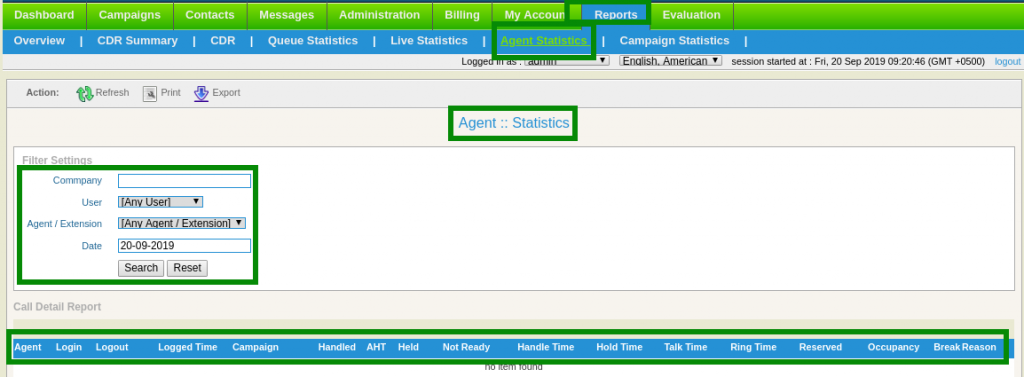
Agents Statistics:
To check overall summary of agents, click on agents statistics sub-menu
Set filer settings, select desired agent from drop-down.
Click on search button to view the detail as shown below:
Campaign Statistics:
To check details of each campaign,click on campaign sub-menu.
set filer settings, select desired campaign from drop-down to see results according to need and
requirements as shown below:
